Reset Identity Column
Here you will learn how to reset value of identity column in a table.
In SQL Server, an identity column is used to auto-increment a column. It is useful in generating a unique number for primary key columns, where the value is not important as long as it is unique.
The following CREATE TABLE statement declares EmpID as the identity column.
CREATE TABLE Employee( [EmpID] [int] IDENTITY(1,1) NOT NULL, [FirstName] [nvarchar](50) NOT NULL, [LastName] [nvarchar](50) NOT NULL);In the above CREATE TABLE SQL statement, EmpID is the IDENTITY column with seed and increment at 1. So, whenever a new row is inserted, the ID will be incremented by 1.
Now, let's insert a row into the new Employee table.
INSERT INTO Employee VALUES ('Aparna' , 'Anand')The above statement will insert the following record.
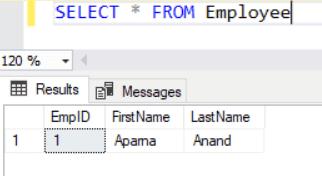
As you can see, the EmpID value is 1 in the first record. If you insert another record then it will be 2 and so on.
Reset IDENTITY column values
For any reason, if an insert fails or is rolled back, the EmpID number that was generated is lost and there will be gaps in the EmpID column. In some cases, this can be ignored and the gaps will not make a difference. But there could be instances when it is necessary to not have gaps in the IDENTITY column. In such cases, you can reset the identity column.
Let's execute the following statement which will raise an error because it tries to enter NULL in the NOT NULL column.
INSERT INTO Employee VALUES('Ron' , NULL);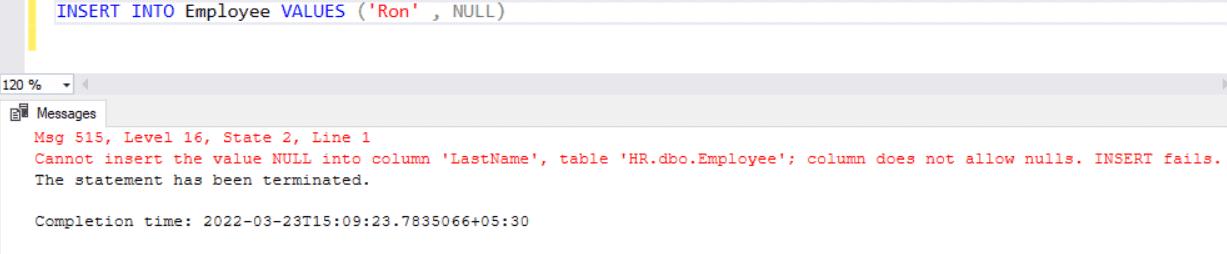
Now, execute the valid insert statement as shown below
INSERT INTO Employee VALUES ('Ron' , 'Kennedy')The above statement will insert a row where the EmpID value will be 3 and not 2, as shown below.
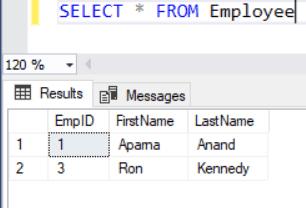
As you can see, the number 2 is missing in the EmpID column. To check the current identity value for the table and to reset the IDENTITY column, use the DBCC CHECKIDENT command.
DBCC CHECKIDENT(table_name [,NORESEED | RESEED[, new_reseed_value]]Parameters:
- table_name: The table for which to reset the identity column. The specified table should have an IDENTITY column.
- NORESEED: Specifies that the current identity value should not be changed.
- RESEED: Specifies that the current identity values should be changed.
- new_reseed_value: New value to be used as the current value of the identity column.
Note: To change the existing seed value and to reseed the existing rows, you have to drop the identity column and recreate it with the new seed value.
To reset the identity column to the starting seed, you have to delete the rows, reseed the table and insert all the values again.
When there are many rows, create a temporary table with all the columns and values from the original table except the identity column. Truncate the rows from the main table. Copy the rows back to the main table from the temporary table.
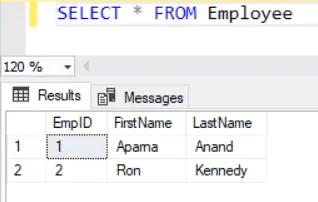
In our example, delete the row with ID 3, reseed the Employee table with 1 so that the next value inserted will be 2 which is the required identity number, and insert the last value again.
DELETE FROM Employee WHERE EmpID = 3; -- delete a row DBCC CHECKIDENT ('Employee', RESEED, 1); -- reset identity column to 1 INSERT INTO Employee VALUES ('Ron', 'Kennedy'); -- insert row againNow, when you select rows from the Employee table, the EmpID column is in order.
Now, insert a few more values into the Employee table.
INSERT INTO dbo.Employee VALUES ('Jeff', NULL) INSERT INTO dbo.Employee VALUES ('Jeff', 'Brown') INSERT INTO dbo.Employee VALUES ('Maria', 'Blight')The first insert will fail because of the NULL value, but the next two statements will insert values in the Employee table.
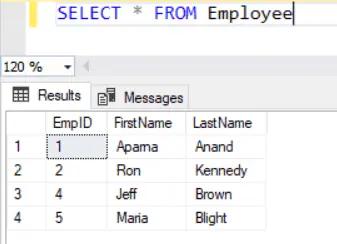
As you can see from the above image, EmpID is generated for every row inserted. For the invalid row, an EmpID is generated but not used which leaves a gap in the EmpID after 2.
To reset the EmpID, we can create a temp table and transfer the data into that temp table; truncate the main Employee table, and insert all rows again.
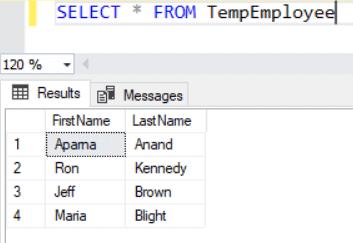
Use the following query to create a new temp table and copy all rows from the Employee table to the temp table. The temp table will not have the identity column (EmpID). It will have all other columns from the main Employee table.
CREATE TABLE [dbo].[TempEmployee]( [FirstName] [nvarchar](50) NOT NULL, [LastName] [nvarchar](50) NOT NULL ); INSERT INTO TempEmployee SELECT FirstName, LastName FROM Employee;The TempEmployee table will be populated with all rows from the Employee table
Now truncate the Employee table to delete all rows. To reset the identity column, you have to truncate the table.
TRUNCATE table Employee;The above statement will delete all the records from the Employee table.
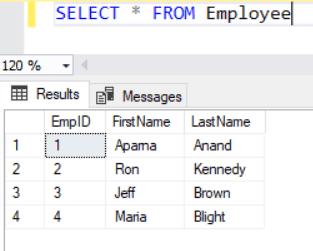
Now, insert all records from the TempEmployee table back to the Employee table, as shown below.
INSERT INTO Employee (FirstName, LastName) SELECT FirstName, LastName FROM TempEmployee;Now, select all rows from the Employee table. The identity column EmpID will be reset and displayed in sequence without any gap.
Thus, you can reset the identity column values.