Everything you build in Azure is defined as an ARM template. Whether you create a service through the Azure portal, PowerShell, REST APIs, or another command-line tool called the Azure Command Line Interface (Azure CLI), ultimately, that service is described within an ARM Template.
When viewing any service in the Azure portal, there is an option for Export Template. Select this option and you will be presented with the underlying ARM template - as in the following example.

This provides great flexibility, and also allows you to define the entire solution, from the hosting components to your application, purely in code.
In an on-premises world, you would typically request an engineering team to build and configure a server for you, for example, a VM running IIS or Apache, or a server running SQL or MySQL.
In Azure, even the hosting components are defined in code and can become part of a deployment pipeline. In other words, the entire solution, from the VM to your application code, can be built, destroyed and rebuilt, in an automated way.
We will look at this end-to-end process in a later tutorial, but for now, we will examine what an ARM template is and how we use them.
And ARM template is a JSON based text file, and is broken down into sections;
- A header containing a Schema, ContentVersion, and an API profile
- Parameters
- Variables
- Function
- Resources
- Outputs
As an involving platform, Microsoft is continually adding new components and adding new capabilities to existing components, for this reason, an ARM template contains information that states the schema and version. Therefore, it is important to ensure that you are using the correct schema, version, and API profile.
Parameters Section
ARM Templates can be built in such a way to be re-usable. To support this, there is a parameters section. Defining parameters tells the template that information must be supplied. These are then added either as a separate parameters file, as command-line arguments, or, when deploying a template within the Azure Portal, will result in parameters form being rendered.
Variables Section
The variables section enables you to define expressions that can be used throughout the rest of the template. For example, they may be used to generate names or other values.
As a dynamic template, you can also define your own functions. These can be used in the variables section or the rest of the template.
Resources Sections
The Resources section contains the details of the component you wish to deploy and will be different depending on the resource you are deploying.
Outputs Section
Finally, you can define outputs. This is useful for chaining multiple templates together. For example, you can capture the Id of the component you have created and pass that to another template.
Quickstart Templates
Microsoft also provides a catalog of quick-start templates on GitHub here https://github.com/Azure/azure-quickstart-templates
Let's take a look at an example template for deploying a storage account. Select 101-storage-account-create, and then select azuredeploy.json
You will be presented with the following file:
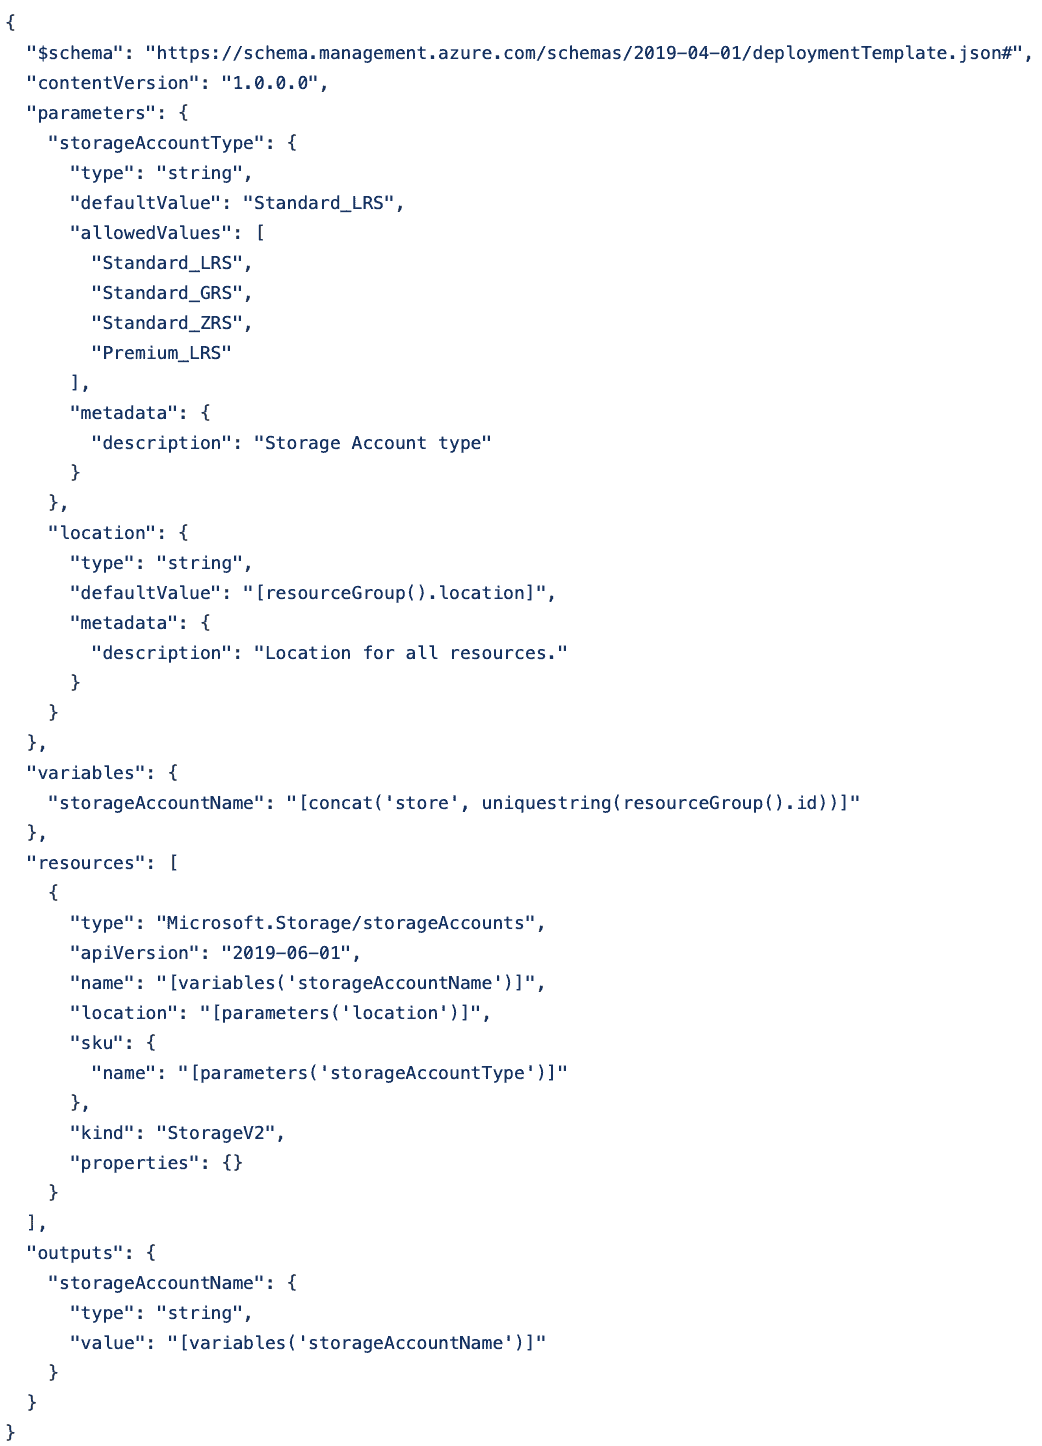
We shall look through the different sections in turn.
First, we will look at the parameters.
"parameters": {
    "storageAccountType": {
      "type": "string",
      "defaultValue": "Standard_LRS",
      "allowedValues": [
        "Standard_LRS",
        "Standard_GRS",
        "Standard_ZRS",
        "Premium_LRS"
      ],
      "metadata": {
        "description": "Storage Account type"
      }
    },
    "location": {
      "type": "string",
      "defaultValue": "[resourceGroup().location]",
      "metadata": {
        "description": "Location for all resources."
      }
    }
  },
This section enables you to set storageAccountType and location when performing a deployment. For each option, we state:
- type - e.g. string.
- Metadata : description - additional useful information that to help explain in what this option is for
- defaultValue - if this option is present, and no parameter is provided, we can create a value either statically by typing what the value should be, or in these examples, use functions to generate the value. We will cover functions in another lesson, but in this template, we are defaulting to the location of the resource group it is being created in.
If we don't set
defaultValueoption it has the effect of making the parameter mandatory. - allowedValues - allows us to set a list of values a user must choose from. When rendered into a form, this becomes a dropdown options list.
Next, we have the variables section. Here, we are setting an account name.
"variables": {
    "storageAccountName": "[concat('store', uniquestring(resourceGroup().id))]"
  },
This is being generated by using another function called uniquestring which generates a string that is unique to the scope you define in the parenthesis - in this case, the resource group.
Next, we have the resource section where we define the component itself.
"resources": [
    {
      "type": "Microsoft.Storage/storageAccounts",
      "apiVersion": "2019-06-01",
      "name": "[variables('storageAccountName')]",
      "location": "[parameters('location')]",
      "sku": {
        "name": "[parameters('storageAccountType')]"
      },
      "kind": "StorageV2",
      "properties": {}
    }
  ],
The type is the service, in this case, a storage account. The name, location, and sku are all taken from either the variables or parameters sections.
The kind is an option that must be set when creating storage accounts. This could have been a parameter, but here we have chosen to statically set it as a StorageV2.
Finally, we set output to return the generated storage account name. This could then be used in a pipeline or script to feed into another template.
"outputs": {
    "storageAccountName": {
      "type": "string",
      "value": "[variables('storageAccountName')]"
    }
  }
}

Brett Hargreaves is a Principal Azure Consultant, who has worked with some of the world's biggest companies helping them design and build cutting edge solutions. With a career spanning infrastructure, development, consulting and architecture, he's been involved in projects covering the entire solution stack using Microsoft technologies. He loves passing on his knowledge to others through books, blogging and his online training courses.