Create and Render Partial Views
Here you will learn what is a partial view and how to use it in the ASP.NET MVC application.
A partial view is a reusable portion of a web page. It is .cshtml or .vbhtml file that contains HTML code.
It can be used in one or more Views or Layout Views.
You can use the same partial view at multiple places and eliminates the redundant code.
Let's create a partial view for the following menu, so that we can use the same menu in multiple layout views without rewriting the same code everywhere.
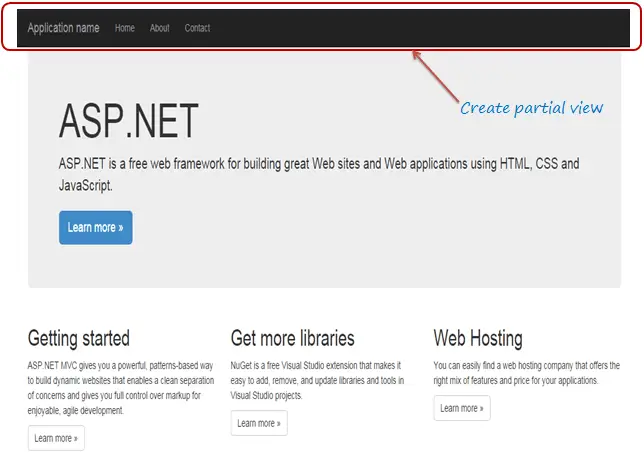
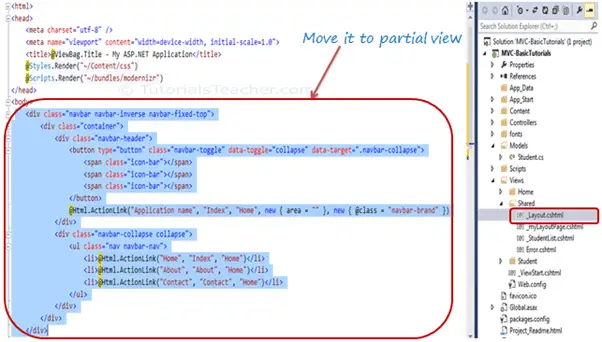
We created our first MVC application before. Open _Layout.cshtml file, and you will see the following HTML code for the above menu bar.
We will cut and paste this code in a separate partial view.
Create a New Partial View
To create a partial view, right click on the Shared folder -> click Add -> click View.. to open the Add View popup, as shown below.
You can create a partial view in any View folder. However, it is recommended to create all your partial views in the Shared folder so that they can be used in multiple views.
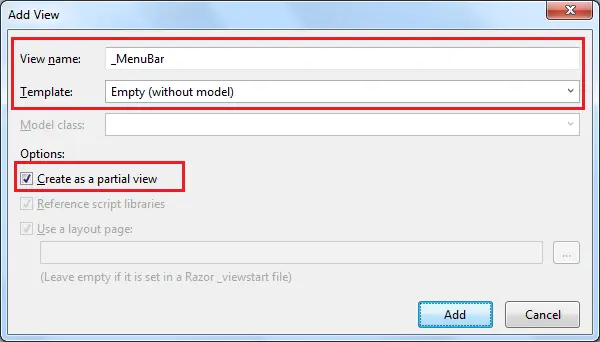
In the Add New Item popup, enter a partial view name, select "Create as a partial view" checkbox.
We don't need not use any model for this partial view, so keep the Template dropdown as Empty (without model) and click on Add button. This will create an empty partial view in the Shared folder.
You can now cut the above code for the navigation bar and paste it in _MenuBar.cshtml as shown below:
<div class="navbar navbar-inverse navbar-fixed-top">
    <div class="container">
        <div class="navbar-header">
            <button type="button" class="navbar-toggle" data-toggle="collapse" data-target=".navbar-collapse">
                <span class="icon-bar"></span>
                <span class="icon-bar"></span>
                <span class="icon-bar"></span>
            </button>
            @Html.ActionLink("Application name", "Index", "Home", new { area = "" }, new { @class = "navbar-brand" })
        </div>
        <div class="navbar-collapse collapse">
            <ul class="nav navbar-nav">
                <li>@Html.ActionLink("Home", "Index", "Home")</li>
                <li>@Html.ActionLink("About", "About", "Home")</li>
                <li>@Html.ActionLink("Contact", "Contact", "Home")</li>
            </ul>
        </div>
    </div>
</div>
Thus, you can create a new partial view. Let's see how to render partial view.
Rendering a Partial View
You can render the partial view in the parent view using the HTML helper methods: @html.Partial(), @html.RenderPartial(), and @html.RenderAction().
Html.Partial()
The @Html.Partial() method renders the specified partial view. It accepts partial view name as a string parameter and returns MvcHtmlString.
It returns an HTML string, so you have a chance of modifying the HTML before rendering.
Visit docs.microsoft.com to know the overloads of the Partial() method.
Now, include _MenuBar partial view in _Layout.cshtml using @html.Partial("_MenuBar"), as shown below.
<!DOCTYPE html>
<html>
<head>
<meta charset="utf-8" />
<meta name="viewport" content="width=device-width, initial-scale=1.0">
<title>@ViewBag.Title - My ASP.NET Application</title>
@Styles.Render("~/Content/css")
@Scripts.Render("~/bundles/modernizr")
</head>
<body>
@Html.Partial("_MenuBar")
@* you can modify result as below *@
@* var result = Html.Partial("_MenuBar") *@
<div class="container body-content">
@RenderBody()
<hr />
<footer>
<p>© @DateTime.Now.Year - My ASP.NET Application</p>
</footer>
</div>
@Scripts.Render("~/bundles/jquery")
@Scripts.Render("~/bundles/bootstrap")
@RenderSection("scripts", required: false)
</body>
</html>Html.RenderPartial()
The @html.RenderPartial() method is the same as the @html.Partial() method except that it writes the resulted HTML of a specified partial view into an HTTP response stream directly. So, you can modify it's HTML before render.
Visit docs.microsoft.com to know the overloads of the RenderPartial() method.
<!DOCTYPE html>
<html>
<head>
<meta charset="utf-8" />
<meta name="viewport" content="width=device-width, initial-scale=1.0">
<title>@ViewBag.Title - My ASP.NET Application</title>
@Styles.Render("~/Content/css")
@Scripts.Render("~/bundles/modernizr")
</head>
<body>
@{
Html.RenderPartial("_MenuBar");
}
<div class="container body-content">
@RenderBody()
<hr />
<footer>
<p>© @DateTime.Now.Year - My ASP.NET Application</p>
</footer>
</div>
@Scripts.Render("~/bundles/jquery")
@Scripts.Render("~/bundles/bootstrap")
@RenderSection("scripts", required: false)
</body>
</html>
The RenderPartial() method returns void, so a semicolon is required at the end, and so it must be enclosed within the @{ }.
Html.RenderAction()
The @html.RenderAction() method executes the specified action method and renders the result. The specified action method must be marked with the [ChildActionOnly] attribute and return the PartialViewResult using the PartialView() method.
Visit docs.microsoft.com to know the overloads of the RenderAction() method.
To render a partial view using the RenderAction() method, first create an HttpGet action method and apply the ChildActionOnly attribute as shown below.
public class HomeController : Controller
{
    [ChildActionOnly]
    public ActionResult RenderMenu()
    {
        return PartialView("_MenuBar");
    }
}
Now, call the html.RenderAction("RenderMenu", "Home") in the layout view, as shown below.
<!DOCTYPE html>
<html>
<head>
<meta charset="utf-8" />
<meta name="viewport" content="width=device-width, initial-scale=1.0">
<title>@ViewBag.Title - My ASP.NET Application</title>
@Styles.Render("~/Content/css")
@Scripts.Render("~/bundles/modernizr")
</head>
<body>
@{
Html.RenderAction("RenderMenu", "Home");
}
<div class="container body-content">
@RenderBody()
<hr />
<footer>
<p>© @DateTime.Now.Year - My ASP.NET Application</p>
</footer>
</div>
@Scripts.Render("~/bundles/jquery")
@Scripts.Render("~/bundles/bootstrap")
@RenderSection("scripts", required: false)
</body>
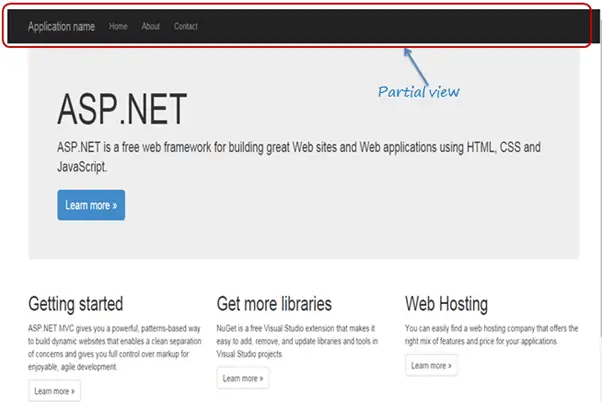
</html>You will see the following result in the browser, irrespective of the rendering method you use.
In this way, you can create a partial view for different portions of the web page in ASP.NET MVC application.
Learn the Difference between html.Partial and Html.RenderPartial.